
EllieBeing /
Elysian-Wolf
A shared journey, recipe resource, sketchbook, and personal blog
I've updated my username to Elliebeing!
Looking for my gaming and rp site? See here
The Journey
Recordings of various readings and insights of a more esoteric nature.

The Cookbook
Leaning towards the efficient and delicious, with some unique ones.
The Blog
Musings, reflections, insights, and various thoughts and themes.


The Sketchbook
Little bits and bobs, concepts, and the growth of a nascent skill.
#002
Full text:
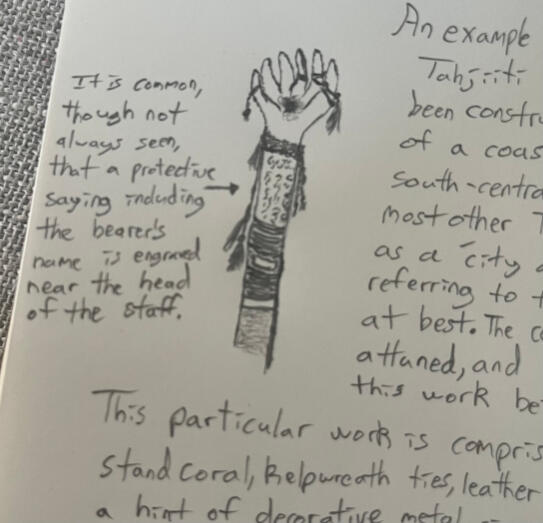
An example of a (nearly complete) Tahjiiti magestaff. This one has been constructed by an inhabitant of a coastal dwelling along the south-central coast, and is what most other Tahjiiti would refer to as a 'city dweller', despite hume referring to the locale as a 'suburb' at best. The centerpiece is not yet attuned, and only will be upon this work being presented and accepted.This particular work is comprised primarily of standcoral, kelpwreath ties, leather grips, fine twine, a hint of decorative metal clasps, and various feathers and beads.Notably, the nomadic tribes and desert-dwellers generally avoid using sealife (plants, animals, or coral) or the remains/parts of any animal in their magestaves. In the former, such things are seen as semi-sacred and are more of a cultural taboo to use. For the latter, pairing such remains near a focus of magic is known to invite danger, and seen as highly irresponsible (and even selfish).Side text:
It is common, though not always seen, that a protective saying including the bearer's name is engraved near the head of the staff.
#001

Early concept of an Enori guard, with notes and details for the species as a whole. The Enori, or t'Enori in the common language of the world, are marsupial-esque bipeds that excel in swimming along the many rivers, lakes, and coastal waters of the new world, also called Edhuae (meaning 'second home'). They are not so robust as most other peoples, but excel in craftworks, trade, and some related areas. t'Enori have developed a rich culture, with some unique groups surrounding particular settlements and city-states, and are well-known for their quality works. Several also take on roles within the performing arts, politics, and envoys of various nature.
A quick note:
I use hashtags for all of the recipes listed here. These are listed below; just click the 'control' and 'f' key at the same time to search for them (Or use whatever search function your browser comes with)What is it?
#beef #chicken #pork #fish #veggies #fruit #carbs #grains
#dessert #chocolate #smoothie #coffee
#dairy #cheese #eggs
#nuts #peanutbutter
#salad #dip #sauceWhen to have it?
#main #sides #breakfast #lunch #dinner
#spring #summer #fall #winterHow to make it?
#oven #stovetop #chilled #lowprep
#blender #bundtpan #crockpotClick here for some general cooking tips
Coming soon: Tropical Tilapia
#summer #fish #fruit #cheese #lunch #dinner #main #fruit #stovetop
Prep time:
Cook time:
Blurb
Ingredients:
Instructions
Coming soon: Seared Lemon-Herb Garlicbutter Salmon
#summer #fish #lunch #dinner #main #stovetop
Prep time:
Cook time:
Blurb
Ingredients:
Instructions
Coming soon: Lime-Finished Shrimp Pad Thai
###
Prep time:
Cook time:
Blurb
Ingredients:
Instructions
Coming soon: Sweet & Smokey Pulled Pork
###
Prep time:
Cook time:
Blurb
Ingredients:
Instructions
Chicken Summer Tacos
#summer #chicken #fruit #cheese #lunch #dinner #main #stovetop
Prep time: About 30 minutes, not including time to boil chicken
Cook time: 10-15 minutes
I threw this together with some leftovers after wanting a different take on my usual taco recipe. To cut down on preparation time, boil the chicken first before letting it cool or even refrigerate until needed. I use chicken thighs because they tend to be much less dry than shredded chicken breast.This comes out a little bit spicy, a little bit sweet, which was just what I was looking for! Use less cheese/sour cream to easily increase those flavors.Be sure to fold your tortilla as in a wrap, as this tends to be juicy.
Ingredients:
Flour or corn soft tortillas
1 lb chicken boneless skinless chicken thighs, boiled
1/3 cup thinly sliced pineapple (bite-sized pieces)
1/3 orange bell pepper, sliced lengthwise and into thirds
1/3 red bell pepper, sliced lengthwise and into thirds
3/4 cup shredded Mexican cheese
1/4 cup carne asada seasoning
Lemon and lime juice, to taste
Salt and pepper, to taste
Sour cream, to taste
Hot sauce of choice, to taste
Red pepper flakes, to taste (optional)
Garlic powder, to taste (optional)
After boiling the chicken thighs, slice these into moderate bite-sized pieces. They should not be too small, as they will be finished with the juices and seasoning.After lightly greasing a hot frying pan, use half of the 1/4 cup carne asada seasoning with a few drops of lemon and lime juice in the frying pan. Add garlic powder (if desired) to taste, as well. I typically do a light 2-second sprinkle. Mix the ingredients well, then let sear on medium flame in the pan for about four minutes. Add the remaining carne asada seasoning, flip, stir, and sear for another four minutes. Once finished, set aside in a small bowl.Add the both types of sliced bell pepper to the frying pan next, with salt, pepper, and red pepper flakes to taste. I usually go for a light 2-second sprinkle of salt, and 1-second for the black and red pepper each. Be sure to mix the bell peppers before letting them sear on a medium flame for about 5 minutes, then flip and sear for another 5 minutes. Repeat as needed until properly seared, then set aside.Next, place the chopped pineapple in a hot frying pan. Let sear on a medium-low flame for 3 minutes. Flip each piece, then let sear for another 3 minutes. Remove and set aside.Using a stovetop or clean frying pan, achieve a medium-low heat. If using a frying pan, grease very lightly. Place the tortilla to sear lightly, flip, and repeat.Set the tortilla on a plate, adding the chicken meat, bell peppers, and cheese to taste. Either place in microwave for 30 seconds or heat on low in a frying pan with a lid to melt the cheese, or leave as-is if desired.Next, add the seared pineapples, a few more drops of lemon juice (to taste), your choice of hot sauce to taste, and a few dallops of sour cream if desired. Fold as in a sandwich wrap to keep juices from making a mess, and enjoy!
Summer Salad with Salmon
#summer #fish #fruit #cheese #nuts #veggies #chilled #lunch #main #stovetop #lowprep #salad
Prep time: 15 minutes
Cook time: 10 minutes
This came out of an exploration, and something of a semi-success. Still, with the right dressing and some alteration, it has room to grow. Sharing
for inspiration and future updates to come!I highly recommend draining as much juice from pineapple as possible. Consider patting on a paper towel. Using more nuts and less cheese may also help, as well as changing the amount of salmon-to-spinach ratio.
Ingredients:
8 oz. fresh spinach
3-4 oz. fresh snap peas, cut into bite-size pieces
1/4 cup crushed walnuts or sliced roasted pecans
2-3 oz. pan-seared salmon, cooled & hand-shredded
1/4 cup shredded parmesan cheese
4 oz. chopped pineapple
1/2 teaspoon bacon bits (optional)
1/2 teaspoon worcestershire sauce (optional)
Dijon honey dressing, to taste
Lemon juice, to taste
FOR THE SALMON: (TO COOK & CHILL)
You can use a salmon burger patty or a filet here. In a lightly greased frying pan, pan-sear about 4-minutes each side, or as instructions indicate. Add a few drops of lemon juice and the worcestershire sauce. Be sure to remove skin after cooking if a filet was used. Once finished, remove from pan and allow to cool. Chill for a few hours or overnight in fridge.FOR THE SALAD:
In a medium or large bowl, add the spinach, snap peas, nuts, cheese, pineapple, and bacon bits. Then, remove the chilled salmon from the fridge and cut/shred into bite-sized pieces. Add to bowl, then finish with dressing to taste.
Mom's Recipe: Cheesy Chicken Crescent Rolls
#chicken #carbs #cheese #lunch #dinner #main #oven
Prep time: Up to 30 minutes, not including time to boil chicken breasts
Cook time: 20-25 minutes
This is one of my all-time favorite 'homey' meals - there are tons of variations online, but I will always consider this one to be my mom's. I strongly recommend boiling the chicken breast and then letting it chill in the fridge overnight or the day before. It can take a bit to shred the chicken.
Ingredients:
2-3 boneless, skinless chicken breasts; boiled and shredded
8-10 oz. shredded cheddar cheese
2 containers of crescent roll dough (I recommend the big, flaky kind)
~10.5 oz. can cream of mushroom soup (can use cream of chicken instead,
or cream of mushroom and roasted garlic, or any similar 'cream of' soup)
~10.5 oz. milk (any kind)
Hot Tip: It's always far-less time consuming and easier to boil the chicken breast the day before, and let it chill in the fridge overnight. It does take a bit of time to hand-shred the chicken (just to small bite-sizes, it shouldn't be too finely shredded), so I always do that at least an hour before I want to eat.
After the chicken breasts have been boiled and then shredded, prepare a 9x13 inch baking pan by greasing it slightly, being sure to grease the walls and edges of the pan too. Then open the first package of crescent roll dough. Using two large dinner plates, place a couple crescent rolls flat on each plate. Place shredded chicken and cheese at the top and halfway down each crescent roll. Then, roll the small end up and continue rolling until the dough is secruely wrapped around, holding, and covering the chicken and cheese inside. You may need to pull the dough or smooth the edges. I recommend squeezing each roll gently in between both hands to help ensure it's packed up nicely.Place each roll into the greased baking pan. Repeat this until both packages of crescent roll dough has been used. Use some of the leftover cheese to sprinkle a moderate amount of shredded cheese over all of the rolls.Next, preheat the oven to 400 degrees Fahrenheit. Take a medium-sized bowl and pour the contents of the soup can into it. Then, fill the soup can back up with milk, and pour that into the bowl as well. Mix thoroughly. Add any remaining chicken and cheese into the bowl, mix it once more, and then evenly spread this 'sauce' over the rolls in the baking pan. Allow to settle in-between the rolls.Cook for 20 to 25 minutes until golden brown. Remove from the oven, then immediately serve and enjoy.* (Leftovers can be stored in the fridge, and reheated in the microwave. They come out great this way! I usually reheat them for 1 and 1/2 to 2 minutes. They're good for another couple days when stored in the fridge.)
* (I recommend fresh, boiled, green beans with a touch of butter;
or another veggie; or salad as a nice side with these.)
* (Most variations of this recipe only call for 2 chicken breasts - I always find that's not quite enough. I typically use 2.5 myself, but if you want more chicken (or to use leftovers for something else); I'd say go ahead and boil 3 of them. You can also use more or less cheese too, or another type if desired.)
Mom's Silver Treasures
#veggies #pork #summer #fall #lunch #dinner #main #side #oven #lowprep
Prep time: 10-15 minutes
Cook time: 30 minutes
This brings back family camp memories, and you can cook these little 'treasures' over a fire or on a grill (10-15 minutes at medium-high flame, per side). Simple, filling, tastes great, and not a lot of work. What's not to love?
Ingredients:
1 lb. Andouille sausage, sliced
1/2 Onion, diced (large pieces)
1 Red bell pepper, diced (large pieces)
1 Green bell pepper, diced (large pieces)
1/2 cup Baby portobello mushrooms, sliced
1/2 cup Baby carrots, halved
Salt (to taste)
Pepper (to taste)
Garlic powder (to taste)
4 Tablespoons Butter (to grease each 'treasure' packet)
Prepare four sheet of aluminum foil, each about 12 inches long. Divide the ingredients among each of the four sheets, adding butter in in multiple spots of each sheet to grease the packet. Add the salt, pepper, garlic powder, and any other desired seasoning. Preheat the oven to 350 degrees Fahrenheit, then fold and roll up the aluminum foil for each packet, being careful to ensure that all of the ingredients inside stay laying flat - avoid 'bunching up' the ingredients, as this will prevent them from cooking evenly. Then, place the packets onto a baking tray (this prevents having to deal with any leaks or spills). Insert into the oven and cook for 30 minutes.Once done cooking, while wearing oven mitts, remove and unfold the top of the aluminum foil. Allow the contents to cool slightly, then serve.
Farmer's Hash with Eggs
#breakfast #carbs #eggs #pork #beef #chicken #cheese #veggies #stovetop
Prep time: 10-30 minutes
Cook time: 20-45 minutes
* (The variation in prep and cooking time depends on if you prep, cook, and chill the sausuage, chorizo, and veggies the night before or not)
Depending on the sausage and/or chorizo used, different meat sources can be included with this recipe. I recommend using golden potato hash browns if possible, but other kinds work too! Eggs can be cooked to preference.
Ingredients:
10 oz. frozen, shredded hash browns (golden or Idaho potatoes do best)
6 oz. shredded mexican cheese (or another type as desired)
6 oz. beef smoked sausage, sliced
4 oz. chorizo sausage
1/4 red bell pepper, diced
1/4 orange bell pepper, diced
1-2 eggs, cooked as preferred
- FOR THE SAUSAGES: (CAN CHILL OVERNIGHT)
In a preheated, lightly greased frying pan, add the sliced beef smoked sausage. Cook on medium setting for 3 minutes, then flip onto the other side and cook for another 3 minutes. Repeat this process, cooking for a total of 6 minutes on each side. For the chorizo, first confirm if the type you have is pre-cooked or not. For raw chorizo, follow the instructions on the packaging to cook it, then allow it to cool, and finely dice. For pre-cooked chorizo, finely dice it and then cook for 6-8 minutes, stirring occasionally, in a preheated and lightly greased frying pan at medium setting.- FOR THE VEGGIES (CAN CHILL OVERNIGHT):
In a preheated, greased frying pan, add the diced bell peppers and cook on medium setting for 3-5 minutes. Flip the peppers and cook for another 3-5 minutes. Then, repeat this process until finished cooking.- FOR THE HASH BROWNS:
Grease and preheat a medium frying pan at medium setting. Then, spread the hash browns evenly into the pan and using a spatula, separate the hash browns into four or more sections. Cook for about 5 minutes, then flip and cook for another 5 minutes. Repeat this process until both sides are golden brown. (I recommend olive oil to grease the pan for hash browns)- PUTTING IT TOGETHER:
Reheat any chilled ingredients. On a large plate, add the hash browns. Then, add the bell peppers and sausages. Finally, top with cheese then place and heat in microwave for 30 seconds. Serve and enjoy.
Famous Pistachio Pound Cake
#dessert #side #nuts #carbs #oven #bundtpan
Prep time: 10 minutes
Cook time: 50 - 60 minutes
* (It is best to check if the cake is done after 50 minutes, and add another 10 minutes as needed. I give tips on checking if it's done below.)
This one is great on its own, though the option of adding chocolate chips, powdered sugar, or even an easily-made icing creates wonders, too! It's actually technically more of a bundt cake than a pound cake, but it sure doesn't end up tasting anything less than scrumptious!
Ingredients:
1 package Duncan Hines brand white cake mix (15.25 oz box)
2 packages Duncan Hines brand pistachio jello pudding mix (3.4 oz each)
4 eggs
1 cup water
1 cup vegetable oil
1 cup chocolate chips (optional)* (The brand for the pistachio pudding jello mix is critical for this recipe to work. You can use a different brand of cake mix. I will update this if I ever find the specific pistachio jello pudding isn't still cutting it.)
Preheat your oven to 350 degrees Fahrenheit. In a large mixing bowl, add the eggs and whisk. Then, add the water and oil and mix well. Finally, add both the white cake mix and pistachio jello pudding mix. Thoroughly mix until smooth. If using chocolate chips, add and mix one last time. Grease the inside of a bundt pan with butter, then pour the mixture in and ensure it settles evenly. Once the oven has reached 350 degrees Fahrenheit, place the bundt pan into the oven at the middle rack and cook for 50 minutes. Then, follow the instructions below to check if the cake is done or needs a little more time to cook.- TO CHECK IF THE CAKE NEEDS ANOTHER 10 MINUTES:
First, using a butter knife, gently prod at the outer edges of the bundt pan. The cake should not leave any residue on the outer edges at all. Do the same check along the inner edge of the bundt pan - there may be a small degree of residue along the inner edged even if the cake is done, but it should not be a lot. Try to avoid prodding the butter knife too deeply (go halfway down into the pan with it at most).Second, using a fresh and clean butter knife, insert it into the middle part of the cake, all the way to the bottom. Remove the butter knife - if it comes out clean AND the edges of the pan did not stick, the cake is done. If the knife comes out with residue from the middle OR if there is any sticking along the edges of the pan when prodding at it, cook for another 10 minutes.- WHEN THE CAKE IS DONE:
Once the cake is done cooking and out of the oven, allow it to cool for about 5-10 minutes. Then, take a large plate and flip it upside-down. Place this on top of the bundt pan (on top of the open side). Next, while wearing an oven mitt on the hand that will touch the bundt pan, place your un-mitted hand on the plate, and the mitted hand on the bottom (closed) side of the bundt pan. Apply a gentle amount of pressure and flip the bundt pan and plate over. Set down on the counter (the plate should be right-side up now). Finally, lightly grab the bundt pan with both un-mitted hands and gently lift it up - the cake should not stick. If the cake sticks, allow to cool another 5 minutes before trying again. If the cake sticks a second time, prod the edges with a butter knife, avoiding sticking the knife too deep.* (Adding a bit of powdered sugar on top, or my Easy Vanilla Icing (bottom of this page) are great extra touches once the cake is done and flipped!)
Simple & Great Pan-Seared Succulent Steak
#beef #main #lunch #dinner #stovetop #lowprep
Prep time: 5 minutes
Cook time: 10+ minutes (depending on preferred 'done'-ness)
This recipe may look long and intimidating at first, but it's really just a few minutes of standing by the frying pan and flipping it over that requires
some attention. This one is easily modifiable to your preferred level of 'done'-ness. Using a small amount of low-fat butter in place of any oil results in a juicier steak, even when pan-frying.
Ingredients:
1 steak (your choice of cut, but under 12 oz.)
1 teaspoon onion powder
1 teaspoon garlic powder
1 teaspoon paprika
1/2 teaspoon red pepper flakes
1/2 teaspoon lemon juice
1/2 teaspoon black pepper
1/2 teaspoon salt
~3 teaspoons butter* (Note: The ~ means 'about', so feel free to use a bit more or less)
* (Note: You can easily cook two steaks at once if they both fit in your frying pan with a bit of room between them. Just double the amount of dry ingredients (spices, salt, and pepper) used; and add another teaspoon or so of butter to marinate the second steak while it cooks too)
First, take the steak out of the fridge and leave it on the counter (at room temperature) for about 10 minutes. Then, flip the steak over and leave it on the counter for another 10 minutes. (This lets the steak 'settle' and naturally come out of being chilled - which helps bring out the flavor of the steak, and the seasoning we'll add while cooking).Next, remove any packaging of the steak and place it on a plate. Add half of the salt and pepper to one side, and gently rub it in. Then add half of the garlic, onion, and paprika to the same side; and gently rub it in. Finally, add half of the lemon juice to the same side, and gently rub it in. Repeat this process for the other side of the steak, flipping it over on the plate.Then, heat a non-stick frying pan on medium heat for about 2 minutes. Add about 1 teaspoon of butter, letting it melt, and tilt the pan around until the melted butter coats the entire bottom of the pan. Place the steak in the pan, letting it cook for 2 minutes. Then, flip the steak over in the pan and let it cook for another 2 minutes.Add an extra 1/4 teaspoon of butter on each side of the steak as it sits in the pan, then flip it over again, and add another 1/2 teaspoon of butter on top of the steak (try to spread the melted butter evenly over the top of the steak). Let it cook for 3 minutes, then flip the steak over one more time and add the butter to each side, and on top of the steak, as previously. Let the steak cook for another 3 minutes.This will result in a medium to medium-well done steak. If you would like the steak to be cooked more or less, adjust the time or add extra flips and cooking time as preferred. Always be sure to use a meat thermometer to check that your steak has reached a safe internal temperature.* (Suggestions for tasty variations: place the finished steak on top of a bed of cooked jasmine rice or risotto, and top the steak with cooked mushrooms and bearnaise sauce. For a side, use cooked asparagus or broccoli (or another vegetable of your choice).)
* (Another tasty variation: Pan-sear some diced bell peppers while you are cooking the steak, using the same frying pan that the steak is cooking in. Once the steak is done cooking, put it on a plate. When the peppers are done, put a paper towel or two on a different plate and place the cooked peppers on it to get rid of excess drainage. Then put the peppers over the cooked steak, and add your favorite steak sauce. For a side, use the salad recipe below.)
Fresh Take on a Classic Summer Salad
#salad #sides #veggies #lunch #spring #summer #lowprep
This refreshing salad has a nice mix of gentle mini-crunches, sweet, and savory flavors. It's a quick make, without a ton of ingredients or fuss.
Ingredients:
12 oz. any spring salad mix
1 and 1/2 cups baby spinach (don't press it down while measuring)
1/2 red bell pepper, diced
1/2 orange bell pepper, diced
1/2 cup feta (replace with goat or bleu cheese if preferred)
Balsamic vinaigrette dressing, to taste (replace with another vinaigrette of your choice if preferred. Raspberry vinaigrette also pairs very well.)
In a large metal bowl, add the spring salad mix and baby spinach. Toss/mix well to disperse them equally. Next, add the diced bell peppers and feta (or your choice of goat or bleu cheese) and toss/mix again. Finally, serve and add your choice of vinaigrette dressing to taste.
Spinach, Pepper, Protein, & Snap Pea Buddha Bowl
#veggies #grains #carbs #eggs #chicken #main #side #chilled #stovetop
This recipe requires some ingredients to be chilled overnight. It is a lot of prep otherwise, plus this method has the bonus of keeping great flavors!
Ingredients:
1 lb. raw boneless, skinless chicken thighs
1 cup cooked jasmine rice (can use another type if desired)
8-10 oz. fresh spinach
1/4 red bell pepper, diced
1/4 orange bell pepper, diced
1/4 cup snow or snap peas
1-2 eggs, cooked to preference (I love using poached eggs with this!)
1/4 teaspoon salt
1/4 teaspoon pepper
1/2 teaspoon onion powder
1/2 teaspoon garlic powder
1 teaspoon lemon juice
1 teaspoon paprika
Chipotle mayo/Yum Yum sauce/honey mustard/dijon mustard (to taste)* (I love the flavor combo of using both chipotle mayo and yum yum sauce, but you can use any sauce or combo of sauces as preferred)
- FOR THE CHICKEN (TO CHILL OVERNIGHT):
After placing the raw chicken thighs flat on a plate, sprinkle half of the salt, pepper, onion powder, garlic powder, and paprika; and gently rub these into the meat. Then, add half of the lemon juice and gently rub over the chicken. Flip each piece of chicken thighs over, and repeat this. Slice each of the chicken thighs into bite-sized pieces as needed. Finally, in a preheated and lightly greased frying pan, cook the chicken thighs (flipping over every few minutes) at a medium-low setting until thoroughly cooked (always use a meat thermometer). Once done cooking, remove from pan and allow to cool. Store in fridge overnight.- FOR THE VEGGIES (TO CHILL OVERNIGHT):
First, if the snow/snap peas are large, cut in half to make them easier to handle and to eat. Then, in a preheated and greased frying pan, add both types of diced bell peppers and the snow/snap peas. Cook at medium setting for 3-5 minutes per side, repeating until these are nearly done cooking. Then, add the spinach and reduce to a medium-low heat setting. For extra flavor, add salt, pepper, onion powder, and garlic powder to taste if desired (I add the same amount of each of these as was used for the chicken). Stir the vegetables to mix and evenly spread the heat, being careful not to lose any spinach. Cook for 2-3 minutes, then stir again. Repeat until the spinach has finished cooking, then remove from pan and allow to cool. Store and chill in fridge overnight.- FINAL NOTES:
I always cook the jasmine rice and chill it overnight, too. Always use separate containers for the chicken, veggies, and rice. Use an oversized bowl when ready to put everything together to reheat the chilled ingredients.
The chilled items will keep for up to two days.- PUTTING IT TOGETHER:
First, cook the eggs in your preferred style. Next, in an oversized bowl, add the cooked jasmine rice, veggies, and chicken. Using a paper towel or other covering, put the bowl in the microwave and heat for 1 and 1/2 minutes. Then, add the cooked eggs on top. Finally, add sauces to taste, and serve.
Coming soon: Off-the-Bone Marsala Inspired Chicken Drumsticks
#chicken #main #sides #lunch #dinner #oven #crockpot
Prep time:
Cook time:
Blurb
Ingredients:
Instructions
Coming Soon: Easy Thai Curry
#
Prep time:
Cook time:
Blurb
Ingredients:
Instructions
Coming Soon: Shakshuka & Toast
#breakfast #eggs #veggies #carbs #spring #summer #fall #stovetop
Prep time:
Cook time:
Blurb
Ingredients:
Instructions
Coming Soon: Simply-Stuffed Bell Peppers
#veggies #beef #grains #cheese #lunch #dinner #main #fall #winter #oven
Prep time:
Cook time:
Blurb
Ingredients:
Instructions
Homemade Buffalo Hotsauce
#sauce #sides #summer #stovetop
This take is a bit spicier than most restaurant-based buffalo sauces I've enjoyed, but it mellows off leaving the core flavor intact (minus the burn!)
Ingredients:
2/3 cup hot sauce (such as Frank's RedHot)
1/2 cup cold, unsalted butter
1 and 1/2 Tablespoons white vinegar
1/4 teaspoon Worcestershire sauce
1/4 teaspoon cayenne pepper
1/4 teaspoon garlic powder
Salt (to taste)
Combine all ingredients in a medium-sized pot, and heat on a medium setting, stirring constantly. As soon as the mixture begins to bubble along the sides of the pot, remove from heat. Stir, then drizzle onto your meal. Store the rest in a sealed container in the fridge. Good for up to 1 week.Hot Tip: If you aren't a fan of garlic flavor, use 1/8 teaspoon of it instead.
The Best Easy Burger
#beef #lunch #dinner #main #summer #stovetop #lowprep
Prep time: 10 minutes
Cook time: 10 minutes
This is an easy, quick recipe that pairs well with SO many toppings. It is my go-to burger recipe; and takes less than half an hour start-to-finish.
Ingredients:
2 lbs Ground Beef
1/2 cup Panko bread crumbs (or crushed saltines)
1 large egg
2 Tablespoons Worcestershire sauce
2 Tablespoons milk (any kind)
1 teaspoon salt
1 teaspoon garlic powder
1 teaspoon onion powder
1 teaspoon paprika
1/2 teaspoon red pepper flakes
1/2 teaspoon black pepper
1/2 teaspoon lemon juice
Sliced cheese (optional)* (Skipping the lemon juice, paprika, and/or red pepper flakes is an option)
Using a large mixing bowl, crack open and pour in the contents of the egg. Mix well with a fork. Next, add the wet ingredients and dry seasoning (everything but the ground beef and panko/saltines). Mix well, then add the ground beef and mix by hand. Ensure that the mixture has spread evenly throughout the ground beef, but be careful not to overwork the meat (this can cause it to become 'loose' and harder to stay together in a patty form).Add the panko/saltines and mix again by hand. Finally, form the patties and use a tablespoon to press down slightly on the center of each patty (this helps it cook evenly).Pre-heat a frying pan on medium setting for 2-3 minutes. Place the patties, careful to avoid overcrowding the pan. Cook for 3 minutes per side. Do this again, for a total of 6 minutes cooked per side. If adding cheese slices, separate into quarters and layer over each patty. Place a lid on the frying pan for about 2 minutes (give or take) until cheese is thoroughly melted. Serve immediately. (Alternatively use a grill instead of frying pan). Always be sure to use a meat thermometer to check that your steak has reached a safe internal temperature.* (This recipe can be halved- however, I would still recommend using 1 whole egg and the entire 1/2 cup of panko/saltines even if the rest of the ingredients are halved. The patties hold together much easier this way)
* (I LOVE searing mushrooms or bacon, and adding that as a topping under the last few quarter-slices of cheese. Adding sriracha mayo sauce is an amazing ketchup alternative, and great flavor combination with bacon and cheese. I like to use a mix of 1.5 cheddar slices and half a slice of provolone. Avocado slices are also an awesome topping with this one.)
Blueberry-Citrus Healthy, Sweet, Power Smoothie
#smoothie #dairy #dessert #fruit #veggies #blender #chilled #lowprep
The 'veggies' included here is just a hint of spinach, and nobody I know has ever been able to taste it at all. This is very good for you, and tastes great!
Ingredients:
1 cup plain greek yogurt
1 cup fresh blueberries
1/2 cup fresh spinach (don't pack it down when measuring)
1/4 cup ice
~1/4 cup orange slices
~1 cup milk (any kind)* (Note: The ~ means 'about', so feel free to use a bit more or less)
Add the yogurt, blueberries, spinach, and ice to the blender cup. Next, add the orange slices, followed by the milk. Then blend, pour into a separate cup, and enjoy.
* (This particular smoothie comes out a bit thick due to the blueberries, but it tastes great (imagine a chilled wildberry smoothie with a hint of citrus, that's really the best I can explain it as!))
Strawberry-Banana Sunrise Power Smoothie
#smoothie #dairy #dessert #fruit #blender #chilled #lowprep
As with the previous recipe, the hint of (un-tasteable) spinach is optional. Use more or less orange slices as desired to taste.
Ingredients:
1 cup plain greek yogurt
3/4 cup frozen strawberries (slices or halves)
1/3 sliced banana, frozen
1/4 cup fresh spinach
1/4 cup ice
~1/4 cup orange slices
~1 cup milk (any kind)* (Note: The ~ means 'about', so feel free to use a bit more or less)
Add the yogurt, strawberries, bananas, spinach, and ice to the blender cup. Next, add the orange slices, followed by the milk. Then blend, pour into a separate cup, and enjoy.
Iced Choco-Nana Peanut Butter Café Frappé
#smoothie #dairy #dessert #coffee #fruit #nuts #peanutbutter #chocolate #blender #chilled #lowprep
This is my favorite way to start the morning, and something of a mini-treat!
Ingredients:
1/3 sliced banana, frozen
1 cup plain greek yogurt
1/2 cup peanut butter
1/4 cup ice
~1 cup chilled coffee
~1 cup milk (any kind)
Chocolate syrup (optional, to taste)* (Note: The ~ means 'about', so feel free to use a bit more or less)
I always make a regular pot of coffee, and after it cools off, I chill it in airtight containers in the fridge. The coffee and milk are the last ingredients to be added before blending, and should take up about half-and-half of the remaining space in your blending cup (adjustable to your preference).First, place the frozen banana slices in the blender cup. Next, add greek yogurt and peanut butter. The milk and then cold coffee should be added next, taking up half the remaining space each (typically about 1 cup each). Finally, add the ice and chocolate to taste (optional). Blend, pour into a separate cup, and enjoy!
Ellie's Easy Vanilla Icing
#dessert #sauce #spring #summer #stovetop
I always like to gently warm this icing, as it will start to harden as it cools and it's much easier to work with this way. It makes a perfect glaze, too.
Ingredients:
1 cup powdered sugar
2-3 Tablespoons milk (any kind)
1/2 teaspoon pure vanilla extract* (If using imitation vanilla extract, add an extra 1/4 teaspoon)
* (For a touch of unique flavor, add a pinch of cinnamon and/or nutmeg)
Preheat a small saucepan at medium-low setting. Add the milk and allow to heat for 1-2 minutes. Then, add the powdered sugar and mix well. Reduce the heat to a low setting. Add the vanilla extract and mix again. Use a spoon to drizzle or pour onto your baked goods of choice.Hot Tips: Avoid leaving the icing in the saucepan with the heat on and unattended. Do not let the icing reach a boil. Avoid simmering for extended amount of time. Any excess icing can be stored in the fridge for up to two days. It can be reheated on a low setting in a saucepan after being chilled.
Recognition
8/29/2023
I'm become increasingly aware of a facet of my past that's been lingering in me for decades. The world seemed to tell me that my mother was great, that I was wrong, that my emotions were ridiculous. However, the screaming and neglect behind closed doors, along other things, when nobody else was around to bear witness suggested otherwise. Oh, I know - things could have been worse. For so long, I've lived with the thought that 'it's not real abuse if it isn't physical'. That in and of itself can be harmful.There will always be those who believe that gaslighting and manipulation are really not that bad, or that they simply don't actually exist. That it's not as if living with everyone else telling you, 'oh, my parents and I get into fights sometimes too' and suggesting you're just overreacting and being ridiculous could ever be an inaccurate assessment or harmful. Fundamental attribution error is a real thing, and so is covert narcissistic abuse.In my case, I bought what was being told to me, hook line and sinker.
As a child, if your mother - the person that is meant to be your first and foundational example of love - neglects, manipulates, and devalues you; how can that not have deep and lasting impact?I recognize that she is a flawed human, as is anyone else. I also recognize that she is not the saint, at least not to me, that she portrays to all others.Nobody wants to come to realize that one of the first and primary examples of love in their life was behaving in a twisted manner towards them. But that is a reality, and accepting that reality is the first chance towards real healing.
An Introduction
7/1/2023
Originally, I had thought to share some examples of communication challenges that we all experience, and methods to overcome them - particularly for those among us that have residual traumas and challenges in standing up for ourselves. However, in thinking through this more, it would be best to offer my insights on what my own challenges are and how I can overcome them. This site is meant to be something of a mix of public record for me, and guidance for others - there isn't any worth or value in it if I'm not being my most authentic self, mindful of the risks.To that end, I'll start with who I am.A fully fledged adult, clipped wings perhaps - though I have managed to grow them out and fly on my own. That isn't easy, but I also remind myself of what good has come: I may not be able to save much, or go on vacations as I'd like, nor do I have a car; but I am stable. I can save a little. There are many alternatives to my life's course that could have been much, much worse.The heart of it is, I have been affected by SA. I was, at that time, so depressed and so lacking in confidence; that I thought: "this is the only chance at love I'll ever have". I stayed with him, for several years. It ended in my nearly losing my life, and I did lose an unborn child.This experience led me to re-examine many things, including my faith and my life's course. I will not speak on matters too deep here, but I will share what I can and what is comfortable. I was able to rise up out of that pit, not without challenge, and in my case; without anyone close enough to know or understand what it was I was going through in that season and time.I believe there are many others like me, and those similar; that do not feel comfortable in speaking their truth, but are desperate for guidance. I believe, and hope, that my story may help guide or positively impact someone - in some way. This is the purpose of this site, the blog, the sharing of my insights and creative efforts. At times, I will reflect on difficult moments of the past. In others, I will look to what is ahead and to what is a current challenge - and tie together how this might link to my experiences.I hope you will gain something from these pages, and if not, at least find an interesting read, or new perspecitve, and experience.
Going Forward
July 7th, 2023
Spread: Check and Guidance
Deck: Tarot of the Divine

Results:
1 (left)- Five of Swords
2 (right)- Two of Swords
3 (middle)- Strength
4 (bottom)- Two of Coins
Interpretation:
This is the first spread I've felt comfortable in guiding myself to create. The purpose in it is to recheck my own insight, and to discover any new perceptions, blind spots, or opportunities that I may not be fully (or at all) aware of. This reading indicated a challenge ahead - my least favorite thing: to confront a difficult scenario from the position between a rock and a hard place. Only developing my strength, which I have allowed to wane, will see me through this in the best manner possible. Meanwhile, though I am slowly working up to fully accepting this fact; the difficult reality that I am left to my own devices to help myself is a troubling thing to overcome. I have felt 'left out in the cold' on a deep personal level for quite some time, and while we all struggle with similar things or our own challenges; that does not take away from the fact of what they are: a challenge. As adults, we often do need to take care of things on our own - this is nothing new, and not something I am incapable of. But that does not mean that I do not feel the 'cold'. The question is posed: "So what will you do?"
A Cause to Motivate
July 1st, 2023
Spread: Early to Mid Career
Deck: The Wild Unknown

Results:
1 (top)- Judgement, inverted
2 (left)- Ace of Pentacles, inverted
3 (right)- The Magician, inverted
4 (center)- Death
5 (bottom)- Three of Wands, inverted
Interpretation:
This was a tough result to see - of note, I read inverted cards as signifying that the associated energy/theme is moving away from me. From this, it is clear that my current perspective at work is not helpful for myself or others - I am having difficulty communicating clearly, and while my belief is that I won't be heard; this could also be just that - my own belief. What would it look like if I were to boldly trust in putting my concern out there instead? How can I trust my colleagues more? Am I selling them short in how I am choosing to perceive them and this situation? There is a lack of growth if I move forward along this path, as it has been. I must put 'death' to the current scenario if I am to unleash my true potential. I cannot trust or rely upon my own vision of what will happen - I need transformation and change to take place. This is not something I am allowing - forgiveness of a perceived transgression or wrong, and the resulting challenge in communication that stems from that. It is not an easy scenario to face.
To refuse to do so, may lead towards stagnation and a loss of growth.
Tarot Spreads
Depending on the guidance sought, different spreads are used. Those I have included on the Journey page are listed below, for others to use as well.

The Check-In
This is an easy spread for a closer look at your current season or life path.
I've found this useful when I want to reflect on possible trends, how the past is influencing me now, and how it or the present may influence the future; without any influence or guidance apart from the insight I can draw.
1 - The Past
2 - The Present
3 - The Future

The Overview
Similar to the Check-In, but with a clear indicator of an overarching theme. This theme may be more pronounced in its relationship between some rather than all of the cards. It is helpful when I've not had clear insight of my own, or in challenging me to perceive or adopt a new perspective.
1 - The Past
2 - The Present
3 - The Future
4 - Overarching Theme

Check and Guidance
A spread meant to provide a check on one's on insight of their current situation, and lead towards the path onwards to better things. The obstacle may be something internal or external, and could be something to overcome, avoid, or directly confront. I find this spread useful when I want to confirm that the self-talk and guidance I am providing and thinking of is in fact, on the right track; or when I want to see if there are different perspectives, blind spots, or insights on my current scenario and path.
1 - Current Situation
2 - Challenge/Goal
3 - Guiding Force
4 - Obstacle

The Current Path
This is helpful in determining one's future choices and actions, and in analyzing our life course from a very top-down level. It offers insight on areas where we can challenge ourselves, and on how we can do so.
1 - Who am I right now?
2 - Am I on the right path?
3 - What's the main obstacle in my way?
4 - What circumstances are in my favor?
5 - How can I make progress and move forward?

Situational Awareness
I've found this very helpful when I am feeling overwhelmed or burdened by a difficult situation. This spread invites us to analyze our fears and concerns, to listen to our inner voice, take on a new perspective, and move forward.
1 - The Obstacle
2 - The Past
3 - Contributing Factor
4 - Guidance
5 - Positive Action

Early to Mid Career Insight
This spread can help us make decisions about what we really want, offer insight on work-related challenges, and potential outcomes - both in pitfalls to avoid as well as positive actions or perspectives that we can take on.
1 - The Current Situation
2 - Potential Outcome if Current Path Continues
3 - Guidance
4 - The Challenge
5 - Focus Area
To contact me, please reach out via the link below:Click to get in touch
Below are some things I've learned across the years:- When making brownies, add a hint (1/4 teaspoon) of cayenne pepper for a tiny unique flavor that's reminiscent of a very mild 'bite' as in ginger snaps- Going off the above, adding both the cayenne pepper and a touch (up to 1/2 teaspoon) of cinnamon makes the unique flavor stand out more- Never start cooking anything in a pan until it's been heated, on medium-low, for a minute or two. Never leave a heating pan unattended.- Always let any beef product sit out at room temperature for about 5-10 minutes after it's been in the fridge before you start cooking it.- Sometimes, adding milk to the mix in scrambled eggs can make them runny. Instead, use about 1/4 Tablespoon of sour cream per egg - it works for fluffy eggs, every time. For a dairy-free option, use a whisk on the egg mixture before adding to the pan, cook on medium-low heat, and let the eggs set - let them cook and form a thin layer when they're first added to the pan. This can take about 3-4 minutes, sometimes 5. Once set, go ahead and scramble, then don't let them sit still again for too long (scrambling every 2-3 minutes) to help increase their fluffiness.- Many people don't taste much of any flavor in paprika. You can use smoked paprika instead. It is a little pricier, so as an alternative, adding
a touch of red pepper flakes can help bring out the flavor, too.- If the recipe calls for pure vanilla extract and you have imitation vanilla extract available, increase the amount by 1.5x (this is correct 90% of time)